Kubernetes
Basic Architecture
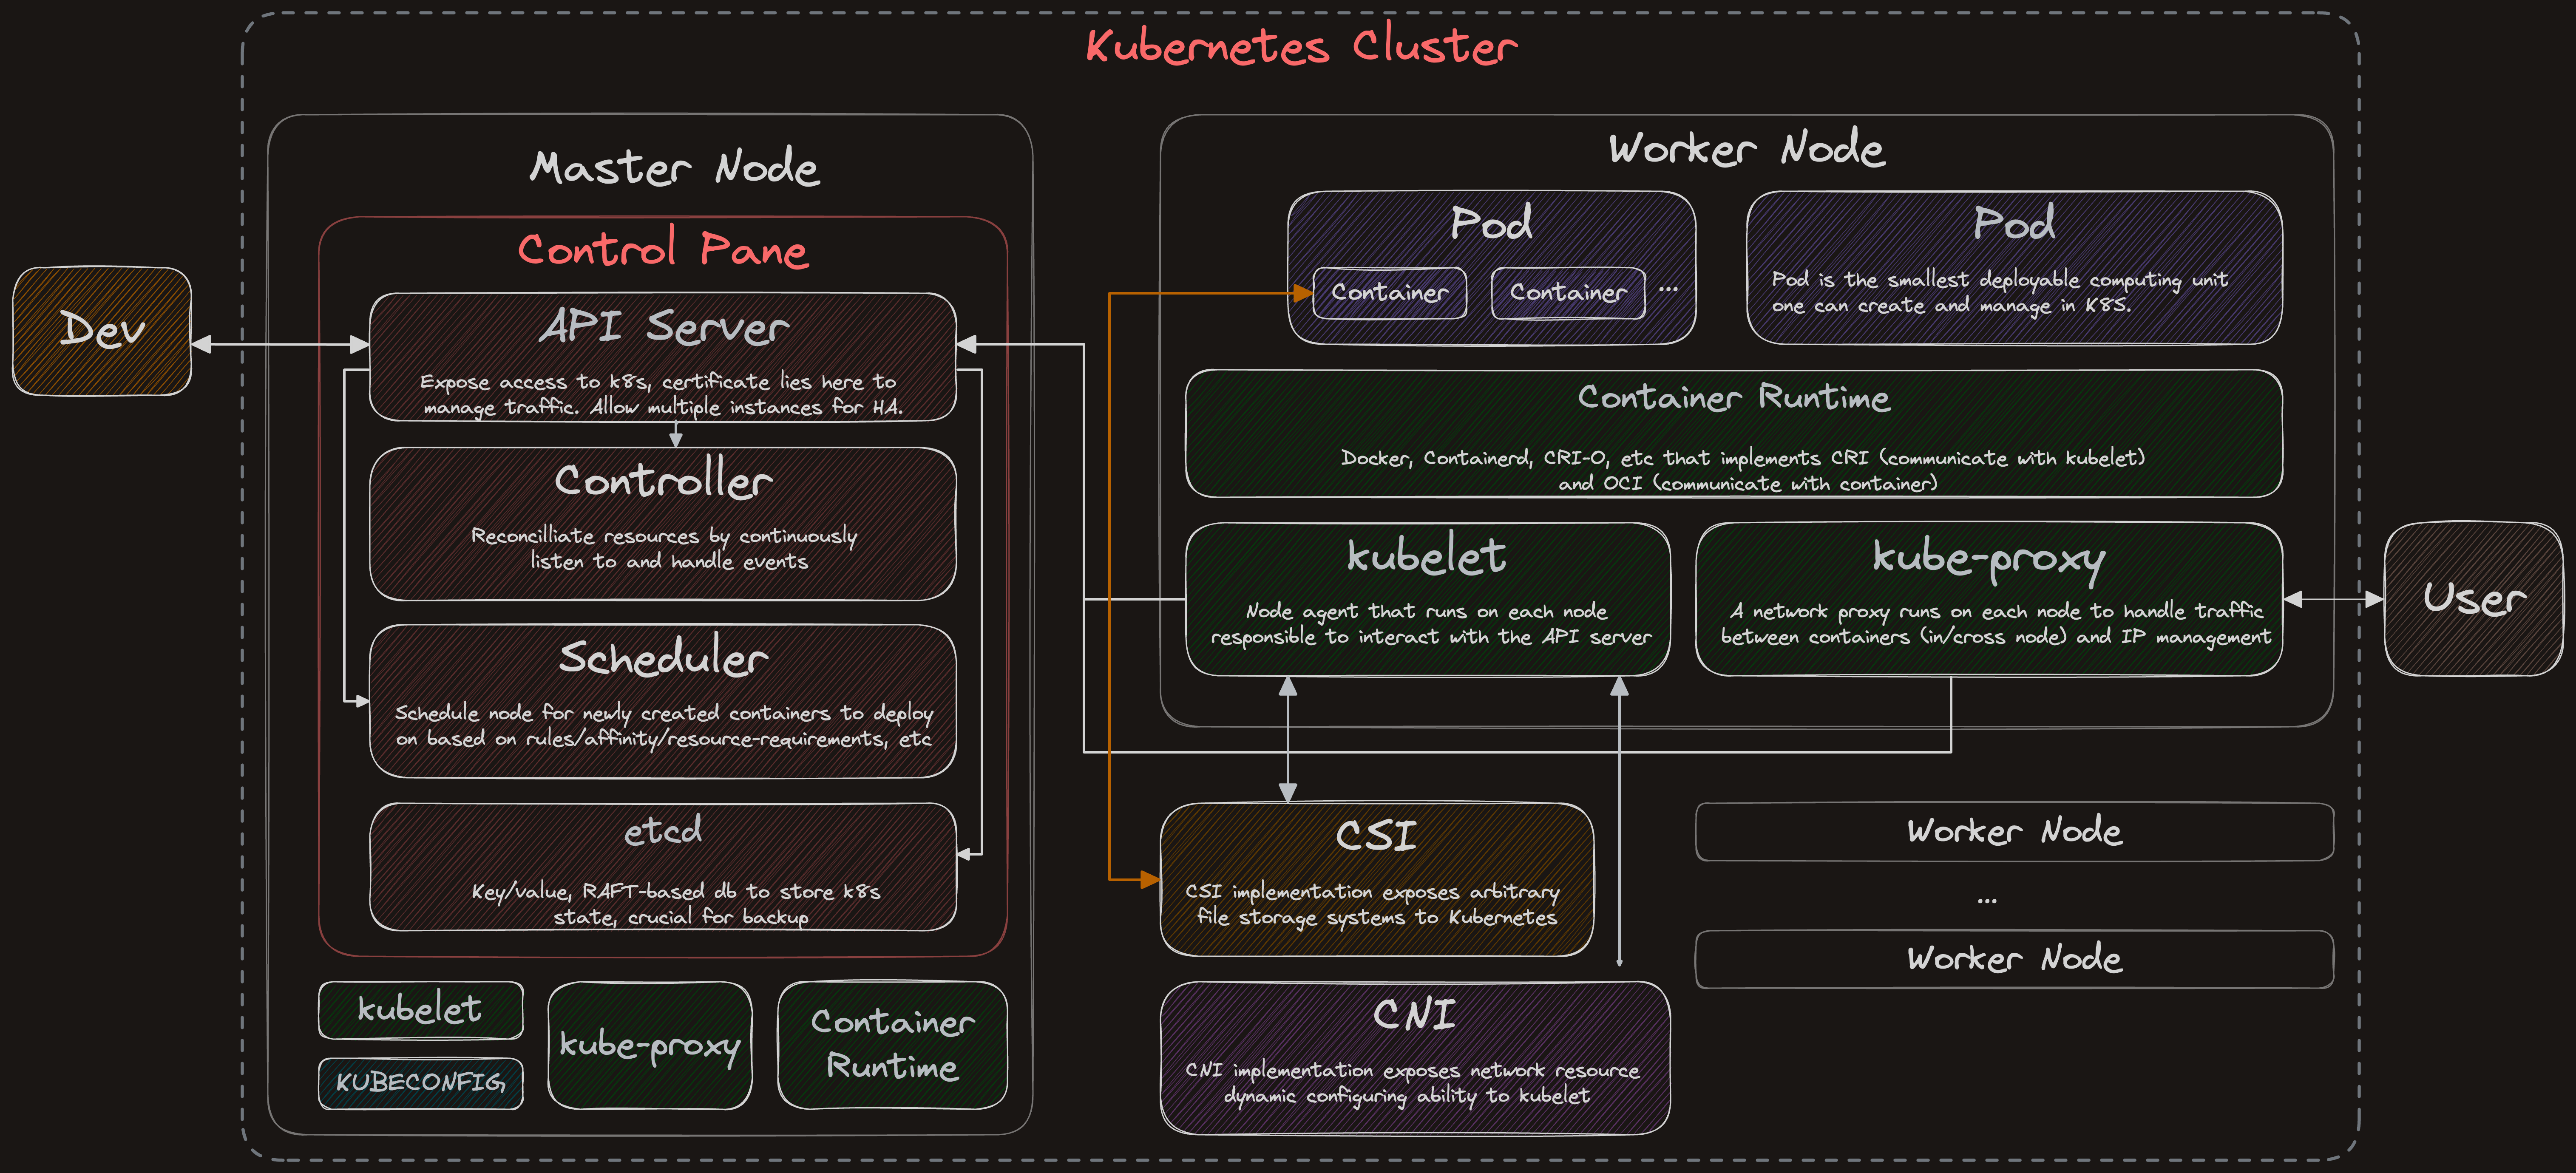
Pod
Pod is the smallest deploy unit in K8S. It has below benefits:
- Simplify port mapping: Without K8S, containers will have to bind to a port on the host machine. Port mapping management becomes a complicated task as container amount increase. With pod, each pod is given an IP address and since pod is recommend to container few containers, port management is constrained within a single POD.
- Enables container runtime replacement: With pod, configuration is pod specific and doesn't depend on specific container runtime, enabling any container runtime to host the container.
- Container within the same pod share the same network namespace and can communicate to each other using localhost but not containers across pod, creating an isolated environment.
- As pod enables containers, a pause container is created in every pod to hold the network namespace such that IP address can be preserved throughout main containers' lifecycle.
Static Pods
Static Pods are pods managed directly by the kubelet daemon on a specific node, without the API server observing them.
- kubelet watches each static Pod (and restarts it if it fails), instead of monitored by control plane
- Watches a specific location on the node:
/etc/kubernetes/manifests - Always bound to one Kubelet on a specific node.
- The kubelet automatically tries to create a mirror Pod on the Kubernetes API server for each static pod, with pod name suffixed with the node hostname with a leading hyphen.
Storage
Storage are important for stateful applications such that data can persist regardless of pods lifecycle. So it must be independent of pod lifecycle, visiblt on all nodes and should survive event the cluster crashes.
kubectl
Useful commands
# Check kubeadm default config
kubeadm config print init-defaults

# Load the kubectl completion code for bash into the current shell, install of bash-completion required
source <(kubectl completion bash)

# Ways to generate a yaml template for target k8s resource
kubectl create service clusterip test-svc --tcp=80:80 --dry-run=client -o yaml > test-svc.yaml
kubectl run test-pod --image=nginx:1.24 --labels="env=prod" --dry-run=client -o yaml > test-pod.yaml

# Get all namespace
kubectl get ns

# Get pod/nodes list
kubectl -n {namespace} get nodes
kubectl -n {namespace} get pods

# Get more info of pod
kubectl -n {namespace} get pods -o wide
kubectl -n {namespace} get pods -o yaml

# Get specific node
kubectl get nodes {node_name}

# Get specific node with detailed information
kubectl get nodes {node_name} -o wide

# Get node info in json/yaml format
kubectl get nodes {node_name} -o json
kubectl get nodes {node_name} -o yaml

# Get info of node current status, useful for debugging
kubectl describe node {node_name}

# Get cluster information
kubectl version
kubectl cluster-info
kubectl api-versions
kubectl api-resources

# Get explanation for resource details, hierarhcy of info can be accessed through '.' chaining
kubectl explain
kubectl explain pod
kubectl explain pod.spec

# Show details of a specific resource or group of resources.
kubectl describe pod


# Print container log
kubectl -n {namespace} logs -f {container_name}
kubectl -n {namespace} logs --since=5m {container_name}

# Execute command in container
kubectl -n {namespace} exec {container_name} -- ls

# Get interactive terminal in container
kubectl -n {namespace} exec -it {container_name} -- bash

# Apply yaml
kubectl apply -f {yaml_path}

# Delete resource included in yaml
kubectl delete -f {yaml_path}

# Delete pod resource
kubectl delete pod {pod_name}

# Forward local port to container port, starts a proxy
# locally requires another terminal when running
kubectl port-foward pod/{pod_name} {local_port}:{container_port}

# Add/delete label to node
kubectl label node {node_name} key=value  # Adds a key:value label
kubectl label node {node_name} key-       # Remove key:value label

# Get namespaced resources
kubectl api-resources --namespaced=false
kubectl api-resources --namespaced=true

# Execute command in the pod without entering the pod
kubectl exec -it pod-name -- sh -c echo "Inside the pod"

# Copy file into/out pod container
kubectl cp -c <container-name> <local-location> <pod-name>:<pod-file-path>
kubectl cp -c <container-name> <pod-name>:<pod-file-path> <local-location>

# Get last applied version of yaml of a given resource
kubectl apply view-last-applied <resource-type> <resource-name> -n <namespace>

# Get resource settings on pods
kubectl get pod -o jsonpath="{range .items[*]}{.metadata.name}{.spec.containers[*].resources}{'\n'}" -n <namespace>

# Troublshooting applications network
kubectl describe <service-name>
kubectl get endpoint
nc <service-ip> <service-port>
ping <service-name>
kubectl logs <pod-name>
kubectl describe pod <pod-name>

# Check kubectl network issue
service kubelet status
jounrnalctl -u kubelet
kubectl config view
kubectl cluster-info

# Restart kubelet on config change
systemctl daemon-reload
systemctl restart kubectl

# Check kubelet config
cat /var/lib/kubelet/config.yaml
Deployment Types
In practice, pods rarely get deployed directly even it's the smallest unit of deployable unit since they get deleted on crash. So simply deploying a pod is often used for testing only.
To provide a more high-level mechanism to handle a broad range of application development and deployment needs, different deploymet configuration types are offered.
Deployment
Deployment is arguably the most used deployment configuration, it has features such as:
- Capable of managing multiple identical replica pods of same images, tags, etc.
- Replica pods may spreard unevenly across nodes
- Pod spec defined under
spec.template - Deployment object manages multiple
ReplicaSetobjects, and aReplicaSetobject manages multiple pods - Deployment object binds all related pods through defined pod labels (
spec.template.metadata.labels) - Often used GitOps to perform deploy/rollback of
Deployment
apiVersion: apps/v1
kind: Deployment
metadata:
  name: nginx-deployment
  labels:
    app: nginx
spec:
  replicas: 3
  selector:
    matchLabels:
      app: nginx                   # deployment label, indicate what pod level to select
  template:
    metadata:
      labels:
        app: nginx                 # pod level label
    spec:
      containers:
      - name: nginx
        image: nginx:1.14.2
        ports:
          - containerPort: 80
      nodeSelector:
        env: test                  # selector rules for node object
To rollback a deployment, use below command:
kubectl rollout undo deployment/{deployment_name}
But manually rollbacking is not a good practice, it is often combined with Git and take advantage of git's version control ability. When deployment yaml is modified, a new version is committed through git. A rollback can be as simple as reverting to next commit and reapply the deployment.
Once the deployment has been successfully rolled out, it generates a replicaSet object which is in charge of managing all pod replicas.
A ReplicaSet's purpose is to maintain a stable set of replica Pods running at any given time. As such, it is often used to guarantee the availability of a specified number of identical Pods.
replicaSet and pod are all given a hash value, so an unique identifier for a pod after applying a yaml file will be:
{podname}-deployment-{replicaSet hash}-{pod hash}
DaemonSet
Job/CronJob
StatefulSet
ConfigMap
Secret
YAML
There are four required fields to describe a kubernetes object:
apiVersion: Which version of the Kubernetes API you're using to create this objectkind: What kind of object you want to createmetadata: Data that helps uniquely identify the object, including a name string, UID, and optional namespacespec: What state you desire for the object
Useful Workflows
-
Deploy Pod From Private Registry
-
With
kubectlkubectl create secret docker-registry nginx-registry-key\
--docker-server=registry.private.com \
--docker-username={{ username }} \
--docker-password= {{ password }} \
--namespace={{ default }}
kubectl apply -f - <<EOF
apiVersion: v1
kind: Pod
metadata:
name: nginx
spec:
containers:
- name: nginx
image: registry.private.com/nginx:alpine
imagePullPolicy: IfNotPresent
imagePullSecrets:
- name: nginx-registry-key
EOF -
With
Dockerdocker login registry.private.com -u {{ username }} -p {{ password }}
kubectl create secret generic nginx-registry-secret \
--from-file=.dockerconfigjson=$HOME/.docker/config.json \
--type=kubernetes.io/dockerconfigjson
kubectl apply -f - <<EOF
apiVersion: v1
kind: Pod
metadata:
name: nginx
spec:
containers:
- name: nginx
image: registry.private.com/nginx:alpine
imagePullPolicy: IfNotPresent
imagePullSecrets:
- name: nginx-registry-key
EOF -
User
docker manifest{
"auths": {
"registry.private.com": {
"auth": {{ secret }}
}
}
}kubectl apply -f - <<EOF
apiVersion: v1
kind: Secret
metadata:
name: nginx-registry-secret
namespace: default
type: kubernetes.io/dockerconfigjson
data:
.dockerconfigjson: {{ secret }}
EOF
kubectl apply -f - <<EOF
apiVersion: v1
kind: Pod
metadata:
name: nginx-1
spec:
containers:
- name: nginx
image: registry.private.com/nginx:alpine
imagePullPolicy: IfNotPresent
imagePullSecrets:
- name: nginx-registry-secret
EOF
-
-
Send signal to container with ephemeral container In some cases, the main container can based on slim images and has limited functions; however,
kubectl debugcreates an ephemeral container and attaches to target container assigned by-tflag, allowing the ephemeral container to share the same pid namespace. This means that runningps,pgrep,kill, etc. in the ephemeral container will work as if one were running them on the target container.kubectl debug -it --image busybox --target <target-container-name> <pod-name>
kill -SIGUSR1 $(pgrep <pid-name>)
Setting up a basic K8S cluster
Option 1: kubeadm
Use kubeadm and the command kubeadm init to start up a K8S cluster quickly.
Option 2: Self bootstrap
- Prepare nodes, note that there is a basic requirement on the worker node.
- Worker node will usually be more powerful than the control plane node.
- Configure all nodes
sudo swapoff -ato disable memory swap, this allows scheduler to stably schedule nodes to which the pod is deployed.- Open ports on nodes
- Giving nodes proper hostname will be beneficial for maintenance
- As K8S components are running as Pods, container runtime (e.g containerd, cri-o) must be installed on all nodes first.
- For example, steps to install containerd can be found here
# Add Docker's official GPG key:
sudo apt-get update
sudo apt-get install ca-certificates curl
sudo install -m 0755 -d /etc/apt/keyrings
sudo curl -fsSL https://download.docker.com/linux/ubuntu/gpg -o /etc/apt/keyrings/docker.asc
sudo chmod a+r /etc/apt/keyrings/docker.asc

# Add the repository to Apt sources:
echo \
  "deb [arch=$(dpkg --print-architecture) signed-by=/etc/apt/keyrings/docker.asc] https://download.docker.com/linux/ubuntu \
  $(. /etc/os-release && echo "${UBUNTU_CODENAME:-$VERSION_CODENAME}") stable" | \
  sudo tee /etc/apt/sources.list.d/docker.list > /dev/null

sudo apt-get update
sudo apt-get install docker-ce docker-ce-cli containerd.io docker-buildx-plugin docker-compose-plugin

sudo mkdir -p /etc/containerd
containered config default | sudo tee/ etc/containerd/config.toml

sudo sed -i 's/SystemdCgroup \= false/SystemdCgroup \= true/g' /etc/containerd/config.toml
sudo systemctl restart containerd
- Install kubeadm, kubelet, and kubectl
# Update the apt package index and install packages needed to use the Kubernetes apt repository:
sudo apt-get update

# apt-transport-https may be a dummy package; if so, you can skip that package
sudo apt-get install -y apt-transport-https ca-certificates curl gpg

# Download the public signing key for the Kubernetes package repositories.
# The same signing key is used for all repositories so you can disregard the version in the URL:
# If the directory `/etc/apt/keyrings` does not exist, it should be created before the curl command, read the note below.
# sudo mkdir -p -m 755 /etc/apt/keyrings
curl -fsSL https://pkgs.k8s.io/core:/stable:/v1.30/deb/Release.key | sudo gpg --dearmor -o /etc/apt/keyrings/kubernetes-apt-keyring.gpg

# Add the appropriate Kubernetes apt repository. Please note that this repository have packages only for Kubernetes 1.30;
# for other Kubernetes minor versions, you need to change the Kubernetes minor version in the URL to match your desired
# minor version (you should also check that you are reading the documentation for the version of Kubernetes that you plan to install).
# This overwrites any existing configuration in /etc/apt/sources.list.d/kubernetes.list
echo 'deb [signed-by=/etc/apt/keyrings/kubernetes-apt-keyring.gpg] https://pkgs.k8s.io/core:/stable:/v1.30/deb/ /' | sudo tee /etc/apt/sources.list.d/kubernetes.list

# Update the apt package index, install kubelet, kubeadm and kubectl, and pin their version:
sudo apt-get update
sudo apt-get install -y kubelet kubeadm kubectl
sudo apt-mark hold kubelet kubeadm kubectl

# (Optional) Enable the kubelet service before running kubeadm:
sudo systemctl enable --now kubelet
- Execute
kubeadm initonce on control plane node
sudo kubeadm init
I1105 14:45:49.803643   13269 version.go:256] remote version is much newer: v1.34.1; falling back to: stable-1.30
[init] Using Kubernetes version: v1.30.14
[preflight] Running pre-flight checks
[preflight] Pulling images required for setting up a Kubernetes cluster
[preflight] This might take a minute or two, depending on the speed of your internet connection
[preflight] You can also perform this action in beforehand using 'kubeadm config images pull'
W1105 14:45:50.042819   13269 checks.go:844] detected that the sandbox image "registry.k8s.io/pause:3.8" of the container runtime is inconsistent with that used by kubeadm.It is recommended to use "registry.k8s.io/pause:3.9" as the CRI sandbox image.
[certs] Using certificateDir folder "/etc/kubernetes/pki"
[certs] Generating "ca" certificate and key
[certs] Generating "apiserver" certificate and key
[certs] apiserver serving cert is signed for DNS names [control-plane kubernetes kubernetes.default kubernetes.default.svc kubernetes.default.svc.cluster.local] and IPs [10.96.0.1 172.31.17.224]
[certs] Generating "apiserver-kubelet-client" certificate and key
[certs] Generating "front-proxy-ca" certificate and key
[certs] Generating "front-proxy-client" certificate and key
[certs] Generating "etcd/ca" certificate and key
[certs] Generating "etcd/server" certificate and key
[certs] etcd/server serving cert is signed for DNS names [control-plane localhost] and IPs [172.31.17.224 127.0.0.1 ::1]
[certs] Generating "etcd/peer" certificate and key
[certs] etcd/peer serving cert is signed for DNS names [control-plane localhost] and IPs [172.31.17.224 127.0.0.1 ::1]
[certs] Generating "etcd/healthcheck-client" certificate and key
[certs] Generating "apiserver-etcd-client" certificate and key
[certs] Generating "sa" key and public key
[kubeconfig] Using kubeconfig folder "/etc/kubernetes"
[kubeconfig] Writing "admin.conf" kubeconfig file
[kubeconfig] Writing "super-admin.conf" kubeconfig file
[kubeconfig] Writing "kubelet.conf" kubeconfig file
[kubeconfig] Writing "controller-manager.conf" kubeconfig file
[kubeconfig] Writing "scheduler.conf" kubeconfig file
[etcd] Creating static Pod manifest for local etcd in "/etc/kubernetes/manifests"
[control-plane] Using manifest folder "/etc/kubernetes/manifests"
[control-plane] Creating static Pod manifest for "kube-apiserver"
[control-plane] Creating static Pod manifest for "kube-controller-manager"
[control-plane] Creating static Pod manifest for "kube-scheduler"
[kubelet-start] Writing kubelet environment file with flags to file "/var/lib/kubelet/kubeadm-flags.env"
[kubelet-start] Writing kubelet configuration to file "/var/lib/kubelet/config.yaml"
[kubelet-start] Starting the kubelet
[wait-control-plane] Waiting for the kubelet to boot up the control plane as static Pods from directory "/etc/kubernetes/manifests"
[kubelet-check] Waiting for a healthy kubelet at http://127.0.0.1:10248/healthz. This can take up to 4m0s
[kubelet-check] The kubelet is healthy after 1.0007649s
[api-check] Waiting for a healthy API server. This can take up to 4m0s
[api-check] The API server is healthy after 5.50139702s
[upload-config] Storing the configuration used in ConfigMap "kubeadm-config" in the "kube-system" Namespace
[kubelet] Creating a ConfigMap "kubelet-config" in namespace kube-system with the configuration for the kubelets in the cluster
[upload-certs] Skipping phase. Please see --upload-certs
[mark-control-plane] Marking the node control-plane as control-plane by adding the labels: [node-role.kubernetes.io/control-plane node.kubernetes.io/exclude-from-external-load-balancers]
[mark-control-plane] Marking the node control-plane as control-plane by adding the taints [node-role.kubernetes.io/control-plane:NoSchedule]
[bootstrap-token] Using token: kpkdeg.ursw5cyytuqfoecp
[bootstrap-token] Configuring bootstrap tokens, cluster-info ConfigMap, RBAC Roles
[bootstrap-token] Configured RBAC rules to allow Node Bootstrap tokens to get nodes
[bootstrap-token] Configured RBAC rules to allow Node Bootstrap tokens to post CSRs in order for nodes to get long term certificate credentials
[bootstrap-token] Configured RBAC rules to allow the csrapprover controller automatically approve CSRs from a Node Bootstrap Token
[bootstrap-token] Configured RBAC rules to allow certificate rotation for all node client certificates in the cluster
[bootstrap-token] Creating the "cluster-info" ConfigMap in the "kube-public" namespace
[kubelet-finalize] Updating "/etc/kubernetes/kubelet.conf" to point to a rotatable kubelet client certificate and key
[addons] Applied essential addon: CoreDNS
[addons] Applied essential addon: kube-proxy

Your Kubernetes control-plane has initialized successfully!
- Create manifests for K8S static Pods (API Server, scheduler, etcd, Controller Manager, kubelet) and add it to folder
/etc/kubernetes/manifests. - Setting up (PKI infrastructure)
- First generate a self-signed CA certificate to sign client/server certificates for K8S components to talk with the API Server.
- Certificates to sign
- Server cert. for API server and client cert. for CM/Scheduler to connect
- Server cert. for etcd/kubelet and client cert. for API server to connect
- Client cert. for kubelet to connect with API server
- Client cert. for admins to connect to API server
- Setup kubeconfig to allow connection to the K8S cluster
mkdir -p $HOME/.kube
sudo cp -i /etc/kubernetes/admin.conf $HOME/.kube/config
sudo chown $(id -u):$(id -g) $HOME/.kube/config
- Install CNI for pod networking
CILIUM_CLI_VERSION=$(curl -s https://raw.githubusercontent.com/cilium/cilium-cli/main/stable.txt)
CLI_ARCH=amd64
if [ "$(uname -m)" = "aarch64" ]; then CLI_ARCH=arm64; fi
curl -L --fail --remote-name-all https://github.com/cilium/cilium-cli/releases/download/${CILIUM_CLI_VERSION}/cilium-linux-${CLI_ARCH}.tar.gz{,.sha256sum}
sha256sum --check cilium-linux-${CLI_ARCH}.tar.gz.sha256sum
sudo tar xzvfC cilium-linux-${CLI_ARCH}.tar.gz /usr/local/bin
rm cilium-linux-${CLI_ARCH}.tar.gz{,.sha256sum}
cilium install
After installing CNI, make sure firewall rules that the CNI implementation requires are configured properly. For instance, Cilium requires these ports to be configured on master node and worker node.
- Join nodes into the cluster
# create command on control plane to join worker node into cluster
kubeadm token create --print-join-command
kubeadm join <api-server-ip>:<api-server-port> --token <token> --discovery-token-ca-cert-hash sha256:<sha-value>
FAQ
Pod Related
- How can we expose pod info to out container?
We can configure and expose to container through env or volume file
Network Related
- Where are cluster IP range defined?
Defined in the api-server yaml file.
sudo cat /etc/kubernetes/manifests/kube-apiserver.yaml

spec:
  containers:
  - command:
    - kube-apiserver
    - --advertise-address=172.31.17.224
    - --allow-privileged=true
    - --authorization-mode=Node,RBAC
    - --client-ca-file=/etc/kubernetes/pki/ca.crt
    - --enable-admission-plugins=NodeRestriction
    - --enable-bootstrap-token-auth=true
    - --etcd-cafile=/etc/kubernetes/pki/etcd/ca.crt
    - --etcd-certfile=/etc/kubernetes/pki/apiserver-etcd-client.crt
    - --etcd-keyfile=/etc/kubernetes/pki/apiserver-etcd-client.key
    - --etcd-servers=https://127.0.0.1:2379
    - --kubelet-client-certificate=/etc/kubernetes/pki/apiserver-kubelet-client.crt
    - --kubelet-client-key=/etc/kubernetes/pki/apiserver-kubelet-client.key
    - --kubelet-preferred-address-types=InternalIP,ExternalIP,Hostname
    - --proxy-client-cert-file=/etc/kubernetes/pki/front-proxy-client.crt
    - --proxy-client-key-file=/etc/kubernetes/pki/front-proxy-client.key
    - --requestheader-allowed-names=front-proxy-client
    - --requestheader-client-ca-file=/etc/kubernetes/pki/front-proxy-ca.crt
    - --requestheader-extra-headers-prefix=X-Remote-Extra-
    - --requestheader-group-headers=X-Remote-Group
    - --requestheader-username-headers=X-Remote-User
    - --secure-port=6443
    - --service-account-issuer=https://kubernetes.default.svc.cluster.local
    - --service-account-key-file=/etc/kubernetes/pki/sa.pub
    - --service-account-signing-key-file=/etc/kubernetes/pki/sa.key
    - --service-cluster-ip-range=10.96.0.0/12
    - --tls-cert-file=/etc/kubernetes/pki/apiserver.crt
    - --tls-private-key-file=/etc/kubernetes/pki/apiserver.key
References
- Kubernetes Official Documentation
- CRI: the Container Runtime Interface
- KEP 753 -- Sidecar Containers